When a page or doorbell is triggered, every zone switches to a predetermined source and volume, then returns to normal operation once the page ends. This article covers configuring paging by sending ASCII commands directly over serial or TCP/IP — for example, using PuTTY.
Configuring via the ProAudio Config Tool instead? See ProAudio — Setting Up Paging Using the Config Tool
How Paging Works
Every ProAudio switch has two independent page presets — Page 1 and Page 2 — each with its own configuration. For example, Page 1 could be used for the front door and Page 2 for the back door. If you have two different sound generators, you can connect each one to a different source and assign it to a different page preset.
@1:16 to @1:32 on a 32-zone switch.Wiring the Trigger Switch
Page 1 is triggered by the DB-1 input, and Page 2 by DB-2. Both accept a dry contact closure — a relay or push-button switch wired to the back of the switch.
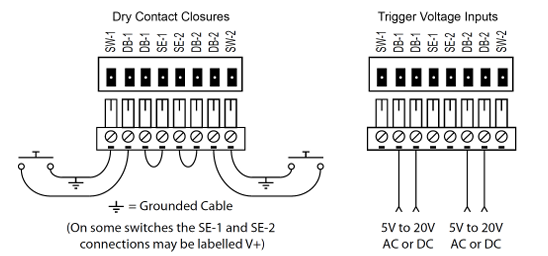
Setting Up Page 1
Run through these steps once for each page you want to configure. This example configures Page 1, triggered by DB-1.
^pASZ 1,@1:16,15$^pVPZ 1,@1:16,40$pVZ instead of pVPZ if you'd rather set the level in dB.^pVMZ 1,@1:16,0$^pADNDZ 1,@1:16,0$pADNDZ command above, Page 1 will trigger correctly but every zone will silently ignore it — there's no error, the zones simply won't switch.^pDSW 1,1,1,0$0 is the timed-mode duration parameter, which "Active on" mode ignores, but the switch still expects it to be present.^pTIME 1,0,0$Setting Up Page 2
Repeat the same six steps using preset 2 and DB-2:
^pASZ 2,@1:16,15$^pVPZ 2,@1:16,40$^pVMZ 2,@1:16,0$^pADNDZ 2,@1:16,0$^pDSW 2,1,2,0$^pTIME 2,0,0$
Removing a Zone From Paging Temporarily
To exclude a single zone from a page — for example, to keep a page from waking a sleeping baby — set that zone's Do Not Disturb flag back to 1:
^pADNDZ 1,@5,1$zone 5 ignores Page 1^pADNDZ 1,@5,0$re-enable zone 5 for Page 1
2 lets the zone respond to the page's volume and mute settings without switching its source — useful if you want a zone to duck in volume during a page but not actually play the doorbell chime.Backing Up Your Settings
^SS 4096$Triggering a Page Manually
If your controller can send ASCII strings, you can trigger a page directly instead of wiring up a physical switch:
^pSET 1$start Page 1^pSET 0$end the page and return to normal
Or trigger a page for a fixed duration, in milliseconds, and let it end automatically:
^pSET 1,4000$ring for 4 seconds, then return to normal automatically
pSET 1$ without a follow-up pSET 0$ — it will automatically time out and return to normal.Testing the Paging System
^pSET 1$.^pSET 0$. Zones should return to their previous source and volume.If zones don't respond, double-check that their Do Not Disturb flag is set to "allow paging" (0) — this is the most common reason a page appears to do nothing.
Related Articles
- ProAudio — Setting Up Paging Using the Config Tool
- ProAudio: Setting Up the Paging System (Control4)
- How to Set Up PuTTY to Communicate with the ProAudio Switches
Our support team can help troubleshoot command syntax or wiring issues.
UK: 01202 413 610 | US: (858) 748-8250 | support@pulse-eight.com