When a page or doorbell is triggered, every zone switches to a predetermined source and volume, then returns to normal operation once the page ends. This article covers configuring paging using Control4 Composer Pro's Properties tab.
If you're configuring paging directly over serial or TCP/IP instead, see ProAudio — Setting Up Paging / Doorbell Using PuTTY (Serial/TCP Commands).
If you're configuring paging using the ProAudio Config Tool instead, see ProAudio — Setting Up Paging Using the Config Tool
How Paging Works
Each ProAudio switch has two independent page settings — Page 1 and Page 2 — each with its own configuration. For example, Page 1 could be used for the front door and Page 2 for the back door. If you have two different sound generators, you can connect each one to a different source and assign it to a different page.
Every zone needs its paging behaviour pre-programmed individually — what it should do when a page is triggered. This is all done from the zone's Properties tab in Composer.
Before You Start
Configuring a Zone's Paging Settings
Because each zone has its own paging setup, you'll need to repeat this process for every zone that should respond to a page.
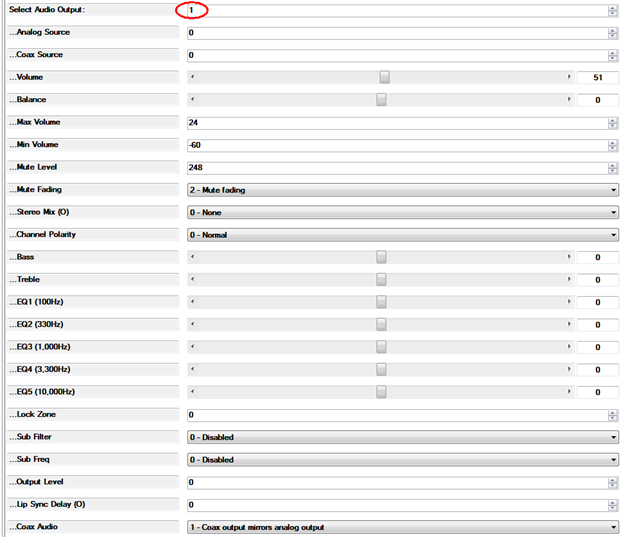
-- Page Select --, pick 1 or 2 depending on which page you're configuring for this zone (e.g. front door vs. back door).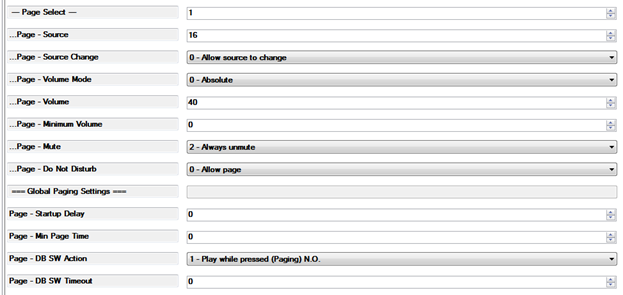
Per-Zone Setting Reference
| Setting | Description |
|---|---|
| Page - Source | The input connected to the doorbell sound generator (or paging microphone preamp) for this zone. |
| Page - Source Change | Controls whether the zone's source actually changes during a page. Turning this off keeps the volume settings active but leaves the source unchanged — useful if the client wants to hear the doorbell chime through a dedicated source but not have every zone switch away from what it's currently playing. |
| Page - Volume Mode | Absolute sets the zone to a fixed volume level during the page, regardless of what it was set to before. Relative raises or lowers the zone's current volume by a set amount, so the page volume moves up and down with the zone's own volume. |
| Page - Volume | Either the absolute volume level to use during the page, or the +/- relative offset, depending on Volume Mode. |
| Page - Minimum Volume | Only used with Relative Volume Mode. If a zone's volume is turned down low enough that the calculated relative page volume would fall below this value, this minimum is used instead. |
| Page - Mute | Controls how the zone's existing mute state is handled during a page — leave it as-is, always unmute for the page, or always mute. Muting every zone during a page can be used as a system-wide emergency mute, which some sites require when a fire alarm is active. |
| Page - Do Not Disturb | Controls whether this zone takes part in the page at all. Set to "Allow page" for the zone to respond; leaving it at its default excludes the zone from paging entirely — useful for temporarily skipping a room (for example, a nursery) without reconfiguring its other paging settings. |
Global Paging Settings
These settings apply across the whole switch, not to an individual zone.
| Setting | Description |
|---|---|
| Page - Startup Delay | Time to wait, in milliseconds, before playing a page. 1000 = 1 second. Useful for giving a power amplifier time to switch on before the doorbell sound plays. |
| Page - Min Page Time | Only relevant when DB SW Action is set to "Play while pressed." If the switch is held for less time than this value, the page plays for the Min Page Time instead — so a quick tap still produces a full doorbell ring. |
| Page - DB SW Action | Defines how the switch input triggers a page: either the page plays for as long as the switch is held ("Play while pressed"), or it plays for a fixed duration regardless of how long the switch is held. Each option is also set for N.O. (Normally Open — the contact is open until pressed) or N.C. (Normally Closed — the contact is closed until pressed) to match your wiring. |
| Page - DB SW Timeout | Used together with DB SW Action when it's set to play for a fixed duration — sets how long the page plays for. |
Wiring the Trigger Switches
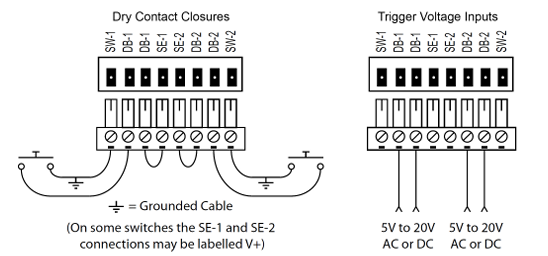
Page Select 1 is triggered by the DB-1 input, and Page Select 2 by DB-2. Both accept a dry contact closure — a relay or push-button switch wired to the back of the switch.
Testing the Paging System
A simple way to confirm paging is working: set a zone's Page - Source to 16, Page - Volume Mode to Absolute, and Page - Volume to 40, with Page - Do Not Disturb set to "Allow page."
Source 16 and volume 40 are just example test values — any source and volume can be used for your actual paging setup once you've confirmed it's working end to end.
Related Articles
- ProAudio — Setting Up Paging / Doorbell Using PuTTY (Serial/TCP Commands)
- ProAudio — Setting Up Paging Using the Config Tool
- ProAudio Product Manual
Our support team can help troubleshoot Control4 driver or wiring issues.
UK: 01202 413 610 | US: (858) 748-8250 | support@pulse-eight.com